The SLS camera – short for Structured Light Sensor camera – has become one of the most talked-about and visually stunning tools in the paranormal investigation field. It’s that device you often see on ghost hunting shows mapping out eerie stick figures in empty rooms, seeminly showing unseen entities moving or interacting with investigators.
But as impressive as the footage can be, using the SLS camera effectively takes knowledge, patience and skepticism. It’s not just a point-and-shoot ghost detector – it’s a sophisticated mapping device that requires proper setup, calibration and understanding to produce credible evidence.
In this guide, we’ll take you through everything you need to know about usnig an SLS camera in the field – from the setup process and scanning techniques to advanced investigation methods, common mistakes and how to properly debunk false readings.
Whether you’re a beginner or a seasoned investigator, this how-to guide will help you get the most out of your SLS camera.
Understanding the SLS Camera
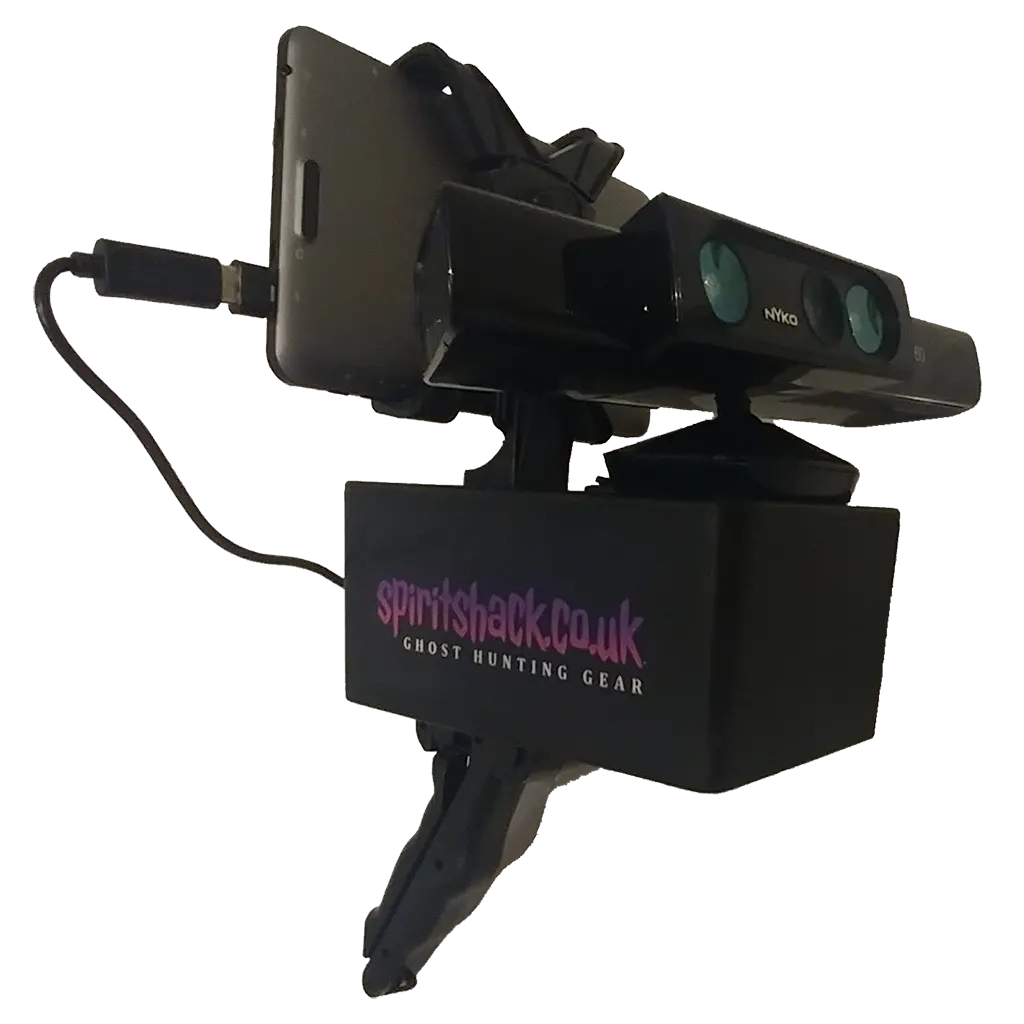
An SLS camera uses infrared depth mapping technology to detect 3D shapes in a space. It works by projecting a grid of infrared dots and then analyzing how those dots reflect back. When the system detects a shape resembling a human form – head, torso, arms and legs – it draws a stick figure overlay on your display screen.
Originally developed for gaming (like Microsofts Kinect system), this technology was late adopted by paranormal researchers because it seemed to detect humanoid shapes where no one was visible – suggesting potential spiritual manifestations.
Setting Up Your SLS Camera
Getting accurate results starts with proper setup. Here’s how to prepare your SLS for reliable investigations.
1. Gather Your Equipment
Most paranormal SLS sets include:
- A modified Kinect or Kinect V2 sensor
- A compatible tablet or laptop with the correct software (e.g. IR mapping or Kinect apps)
- A stable power source or portable battery pack
- Mounting hardware (tripod, handle grip or rig system)
- Optional external recording camera for documenting your session
2. Choose a Controlled Location
Find a space that’s not cluttered, has low ambient light and minimal reflective surfaces. The SLS relies heavily on infrared accuracy – mirrors, shiny walls or hanging objects can cause mapping errors.
3. Calibrate the Sensor
Before starting, point the SLS camera at a person you can see. Ensure the camera properly detects and maps them as a stick figure. This calibration step confirms your systems alignment and helps prevent false readings later.
4. Stabilize the Camera
Mount the SLS camera on a tripod or stationary platform. Handheld use is fine for quick scans, but a table setup provides much clearer data and minimizes motion-related glitches
5. Test Your Rance
The Kinect-based SLS camera have an optimal range of about 2-12 feet (0.6-3.6 metres). Beyond this, accurace drops drawatically. Stay within that range for the best mapping results.
How to Use the SLS Camera in the Field
Once your camera is ready, follow these field-tested methods for effective use during paranormal investigations.
1. Start with a Baseline Sweep
Before asking questions or inviting interaction, do a slow environmental sweep. Move gradually across the room to see what static ovjects appear. This helps you identify areas that may cause false readings – like furniture, statues or uneven walls.
2. Scan Slowly and Deliberately
The SLS needs time to interpret the infrared reflections. Move the camera in slow, steady arcs, pausing every few seconds to allow the software to register the environment accurately.
3. Focus on Known Hotspots
Point your camera toward areas where other devices have indicate activity – like cold spots, EMF fluctuations or previous visual anomalies. Spirits often manifest in clusters of environmental changes.
4. Watch for Interaction
If a stick figure appears, not whether it’s reacting to your presence or commands. Some investigators report figures waving back, bending toward devices or mimicking movement- signs often taken as possible intelligent responses.
5. Record Constantly
Always record video output from your SLS session. This allows for detailed post-investigation analysis and proof that no one was physically present during the captures.
Beginner Tips for First-Time Users
- Avoid mirrors and glass: infrared reflections easily trick the SLS.
- Do short sessions: 15-20 minutes at a time keeps the data manageable.
- Always double-check lighting: complete darkness isn’t ideal; low ambient light helps.
- Don’t rush your scans: the slower you go, the more accurate your data.
- Label your evidence immediately: note time, location and environmental conditions for each anomly.
Pro Techniques for Experienced Investigators
If you’ve mastered the basics, here’s how to elevate your SLS work to professional standards.
1. Pair with Complimentary Tools
Use your SLS alongside EMF meters, EVP recorders or thermal cameras. Cross-verifying simultanneous activity helps strengthen your findings.
2. Lock-Off Cameras
Use a stationary setup pointed at one area for extended periods. This reduces interference from movement and capturews long-duration manifestations.
3. Test for Interaction in Real Time
Ask Questions like:
- “Can you step closer to the device?”
- “Can you raise your hand if you can hear me?”
If the figure visibly reacts to your commands, document it carefully.
4. Document Environmental Changes
If an SLS figure appears, immediately check for EMF spikes, temperature drops or sound anomalies. True manifestations often occur alongside measurable changes.
5. Use Multiple Angles
If possible, run a secondary SLS camera aimed at the same area. Two different angles can help confirm or rule out reflections and shadows.
Common Mistakes to Avoid
Even experienced investigators can fall for technical errors. Keep these in mind:
- Scanning too quickly: Rapid movement creates mapping flickers mistaken for ghosts.
- Overreliance on visuals: Never assume every stick figure is paranormal.
- Poor calibrationg: Without calibration, your camera may constantly misread the environment.
- Ignoring environmental interference: Shadows, uneven textures and furniture edges often trigger false figures.
- No supporting data: Visual evidence without temperature or EMF changes is weaker and easily debunked.
How to Debunk SLS Camera Reading (Step-by-Step Guide)
The credibility of your investigation depends on your ability to debunk false positives. Follow this systematic process every time your SLS camera detects a figure.
Step 1: Pause and Observe
When a figure appears, stop scanning. Observe its actions:
- Is it attached to a static spot?
- Does it repeat identical movements?
- Is it flickering or jumping eratically?
If it attaches to a chair, wall or curtain – it’s possibly a software mapping artifact, not a spirit.
Step 2: Physically Inspect the Area
Have someone go to the spot where the figure appeard and look for:
- Shadows or uneven surfaces that resemble limbs.
- Reflective materials like mirrors, chrome or glossy paint.
- Hanging objects or furniture that might mimic a torso or arm.
If any of these exist, you’ve likely found your false trigger.
Step 3: Recreate the Conditions
Try to reproduce the anomaly:
- Move the camera back to the same position.
- Change the angle slightly to see if it remaps.
- Ask another person to stand there – if they map identically, the space shape triggered the system.
A figure that reappears uned the same conditions is probably environmental.
Step 4: Test for Interaction
If no environmental cause is obious, test for an intelligent response.
- Ask the figure to move or wave.
- Step toward it and watch if it reacts.
- Observe whether it moves with you or independently.
An interactive figure that seems self-aware is harder to debunk – but still requires cross-verification.
Step 5: Cross-Check with Other Devices
Document what else is happening at the same time:
- Did EMF meters spike?
- Was a cold spot detected nearby?
- Did audio recorders capture a voice or sound?
When multiple devices register anomalies simultaneously, your evidence gains weight.
Step 6: Review Your Footage in Detail
After the session:
- Slow down the playback to 0.25x speed.
- Watch for flickering, lag or figure distortion (common in false readings).
- Compare with your environmental notes to identify causes.
Debunking is about removing every possible natural explanation before considering something paranormal.
Step 7: Keep a Debunk Log
Maintain a written record of all false positives and their causes (e.g. reflective chair, uneven brick wall, sensor drift). This not only improves your future accuracy but also shows professional integrity in your findings.
Advanced Debunking Tips
- Run control tests in the same room during the day to identify static mapping errors.
- Watch for symmetry – true anomalies rarely appear perfectly symmetrical.
- Compare sensor noise – if your camera is lagging or overheating, false figures are common.
- Use a second SLS or camera to confirm – genuine anoamlies often show up from more than one angle.
Final Thoughts
The SLS camera is one of the most visually impressive and controversial tools in modern paranormal research. When used responsibly, responsibly it can provide stunning visual documentation – but only when paired with methodical testing and strong debunking discipline.
Always remember that real evidence stands up to scrutiny. The more thorough you are in testing, recreating and verifying your captures, the more legitimate your findings become.
Approach every session with an open mind, a skeptical eye and the goal of uncovering truth – not just proof. That’s what separates genuine paranormal investigators from habbyists.
Related Posts:
- https://paranormaldownunder.com/how-to-use-a-spirit-box-guide/how-to-guides/
- https://paranormaldownunder.com/cleanse-protect-yourself-paranormal-investigation/how-to-guides/
- https://paranormaldownunder.com/how-to-start-as-a-paranormal-investigator-step-by-step-beginners-guide/how-to-guides/
- https://paranormaldownunder.com/trigger-objects-in-paranormal-investigation-how-they-work-and-why-ghost-hunters-use-them/research/
- https://paranormaldownunder.com/sls-camera-paranormal-investigation/equipment/